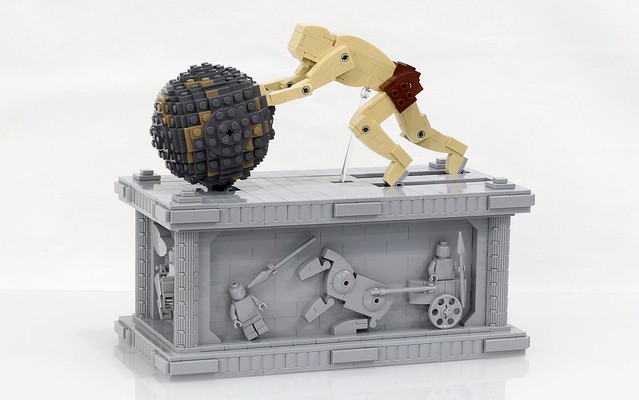
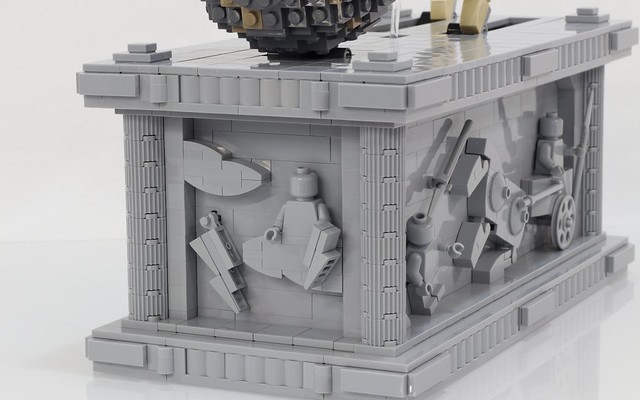
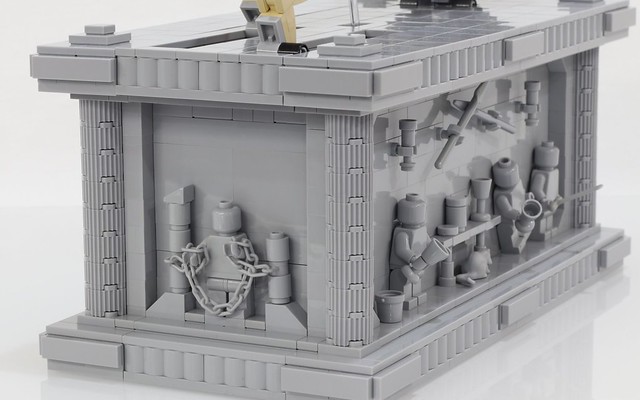
Revisiting old models is something I don’t usually do, but as I was finishing up the Lawnmower Man model a few months ago, I got to thinking it might be time to take another look at my original Sisyphus model. Was there a better way to support the body other than the intrusive (and ugly) black rod sticking out of the base? Had the LEGO Group released any new parts that could be used to improve the design? It turns out the answer to both those questions was yes.
Another thing I discovered was that some of the parts I used in the original had become extremely expensive in the secondary market (the click hinges I used for the ankles, for example), making it challenging and pricey for people to source the parts to build their own copy of the model.
I ended up redesigning the model pretty much from the ground up, and even though the overall appearance and functionality hasn’t changed, I did make some significant improvements to some parts of the design. I discuss many of these changes in the video below, where you can also see the new model in action. Instructions for the model can also be found below.
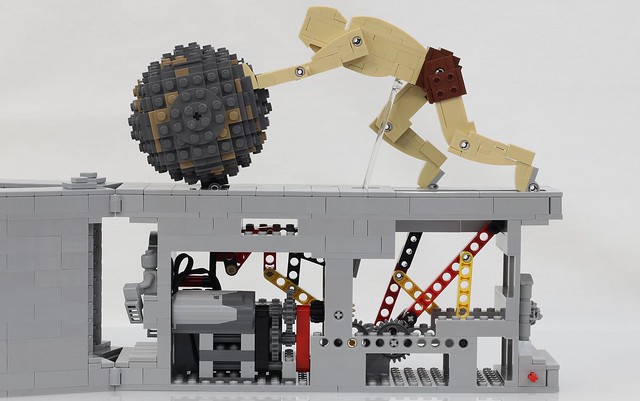
I have created building instructions for both a motorized and manually powered version of the model. The only difference between the two is the motorized version includes the steps and parts needed to build a motor assembly (using a Power Functions M-Motor and AAA Battery Box) that can be inserted inside the base. The motorized version can also be powered in the same way as the manually powered version, using a crank on the back, by disengaging the motor.


Construction Notes
To achieve the optimal motion of the model, it’s best to ensure the movement of the boulder is in sync with the movement of the legs. The boulder should be in its forward most position when either of the legs is at their furthest back position. You can easily change their relative positions after you have built the model. Just slide the black 12 tooth gear on the main drive shaft to disengage it from the gears driving the legs, rotate each of the now separated drive components until the the boulder and legs are in their correct relative positions, then reengage the gear.
You can manually power the motorized version of the model by simply disengaging the motor from the main drive shaft. To do this you simple need to slide the tan 20 tooth gear along the drive shaft until it is disengaged from the black 12 tooth gear at the end of the motor assembly.
I’m going to become a LEGO designer, and I was wondering if you had any tips for me. If so please let me know,
After a year+ delay due to life events, I finally finished my Sisyphus It is a beautiful model and works perfectly.
Thank you for the time and effort you put into this!
If someone is on the fence about ordering, Just Do It! You will NOT be disappointed.
I’m definitely going to buy off MOCHUB. My question is this: how complicated is it to switch from motorized to manual operation?
I see this: ‘To do this you simple need to slide the tan 20 tooth gear along the drive shaft until it is disengaged from the black 12 tooth gear’. How much do you have to take apart to do that.
Is the manual crank included in the MOCHUB motorized kit?
Thank you,
David
You just have to open the front to slide the gear over. In my video for the original model I show how it is done at 1:40 (link is time stamped) – https://youtu.be/pKrHTYqm8pw?t=100 The updated version of the model works the same way in that respect. The manual crank is included in the motorized version.
Jason – Can you provide the exact HxWxL dimensions? I can see this build sitting on the shelf for a while and would love to keep the dust off it.
Sure, the base is about 14cm x 27cm, and it’s about 22cm tall.
your sisyphus kit is too expensive for me I’m 9 please make your kit cheaper.
Pleeeeeeeeeeeeeeeeeeeeeeeeeeeeeeeeeeeeeeeeeeeeeeeeeeeeeeeeeeeeeeeeeeeeeeeeeeeeeease make it cheaper I really want to buy it.
Is the kit now on MOCHUB this new version, or the older version?
It’s the new version.
This is one of your most beautiful models! I remember with the old version you gave a stripped down version of the parts list that meant it would be cheaper to assemble – have you done this for the new one? Would love to build it!
Do you mean the version without the decorated base? If so, then, no I haven’t for this one.
Hi, Jason.
I was just wondering if it would be easier to buy the whole model on MOCHUB or buy each individual piece on Bricklink because i only have a tiny fraction of the pieces i need.
Thanks,
Camden
It really depends on where you are in the world. Shipping is what kills you with Bricklink orders. You can probably find the parts for cheaper on Bricklink if you shop around, but if you have to make multiple orders, you can easily lose all the savings by having to pay for shipping on multiple orders.
Love this model! I have about half the parts not many technics. Do you thinks it will be cheaper to buy from mochub or parts from rebrikable.
If you already have half the parts, it will definitely be cheaper just to order whatever else you need yourself.
The LDraw file seems corrupt… i cannot download it and when i dubbleclick on the link i get a bunch of numbers on my screen.
Do you know how i could fix that?
Kind regards,
Tim
They seem okay. What do you mean by ‘I cannot download it’? Also, the LDraw file format is pretty much just a bunch of numbers.
I built the original motorised version some time ago and I love it. I’d like to ‘upgrade’ to this new version. Is there a relatively easy way to see the extra parts I’d need? I use Rebrickable and have marked the original as ‘constructed’ which removes those parts from my collection. I could unmark it and mark the new version but the new version isn’t in Rebrickable yet.
Congrats on improving on an already impressive piece.
I haven’t uploaded the new version to Rebrickable yet, but when I do, there is a feature there that allows you to compare the parts between models.
Ah, I see. It’s there now. Thanks very much. 🙂
hey jason, jason here 😛
is it possible to still get the old plans? i’m kind of a completest and always interested in different building techniques and wouldn’t mind still building the old model to compare builds side by side.
thanks in advance.
Yes, the old plans are still available in my original post: http://jkbrickworks.com/sisyphus-kinetic-sculpture-original
Dear Jason,
I am a student and just bought a 3D printer. I would love to try and 3D print all the pieces and assemble them into the manual model.
I use fusion 360 for modelling myself and i was hoping that you could provide me with the digital files for this project.
Kind regards,
Tim
You can download the LDraw file for this model (link is in the instructions box). No idea how you might get that into Fusion 360 though. Maybe there are some conversion tools out there? I know you can import LDraw files into Blender, so maybe you can go through that?
Jason, I just told my husband I want this for my birthday. I LOVE LOVE LOVE Sisyphus!!! Do you know if the engineer head lego kit is for sale any where? Thanks for your amazing videos. WOW, WOW, WOW.
Cool, that’s awesome. Hope he comes through for you! 🙂 I haven’t made instructions for the engineer head (it’s quite a complicated model), so no kit available for it.
That’s funny, I wanted to build this model for months and last week I finally ordered everything from bricklink – except the expensive ankle-parts 🙂
I guess I now need to figure out all the parts I am missing for the new model, because I really like the “cleaner” look with the transparent rod.
I really appreciate that you provide instructions for all these awesome models of yours. Keep up the good work! Best regards, Chris
Sorry to hear about the unfortunate timing. I know quite a few people are in various stages of collecting parts for the original model, and I do feel bad about that. You can actually still build much of the base using the parts and instructions from the original model and it will still work fine in the new model. In fact, you can kind of just pick and choose what upgrades you want to make. Changing the support rod and corresponding mechanics will require the most changes, but they are mostly isolated to the top of the center section of the model.
Thank you for the quick reply.
No need to feel bad – collecting parts is half the fun 🙂
Hahahaha I am both elated and bummed…I literally received the last parts I needed in the mail today! But I too am going to figure out which parts are different because the clear rod and clean top look AWEsome. Thanks for the beautiful upgrade Jason!
But you can bet I’m going to construct the old model in the mean time! It’s too cool not to 🙂